Amazon Redshift is a fully managed, petabyte-scale data warehouse service in the cloud. It is built on Amazon Web Services
Overview
Hightouch lets you pull data stored in your Amazon Redshift data warehouse and push it to downstream destinations. Most of the setup occurs in the Hightouch UI, but you need access to Redshift for information like your host, port, database name, and credentials.
You may need to allowlist Hightouch's IP addresses to let our systems connect to your Redshift cluster. Reference our networking docs to determine which IP addresses you need to allowlist.
You can also securely connect to your Redshift cluster using AWS PrivateLink. AWS PrivateLink is a Business Tier feature.
Connection configuration
To get started, go to the Sources overview page and click the Add source button. Select Amazon Redshift and follow the steps below.
Choose connection type
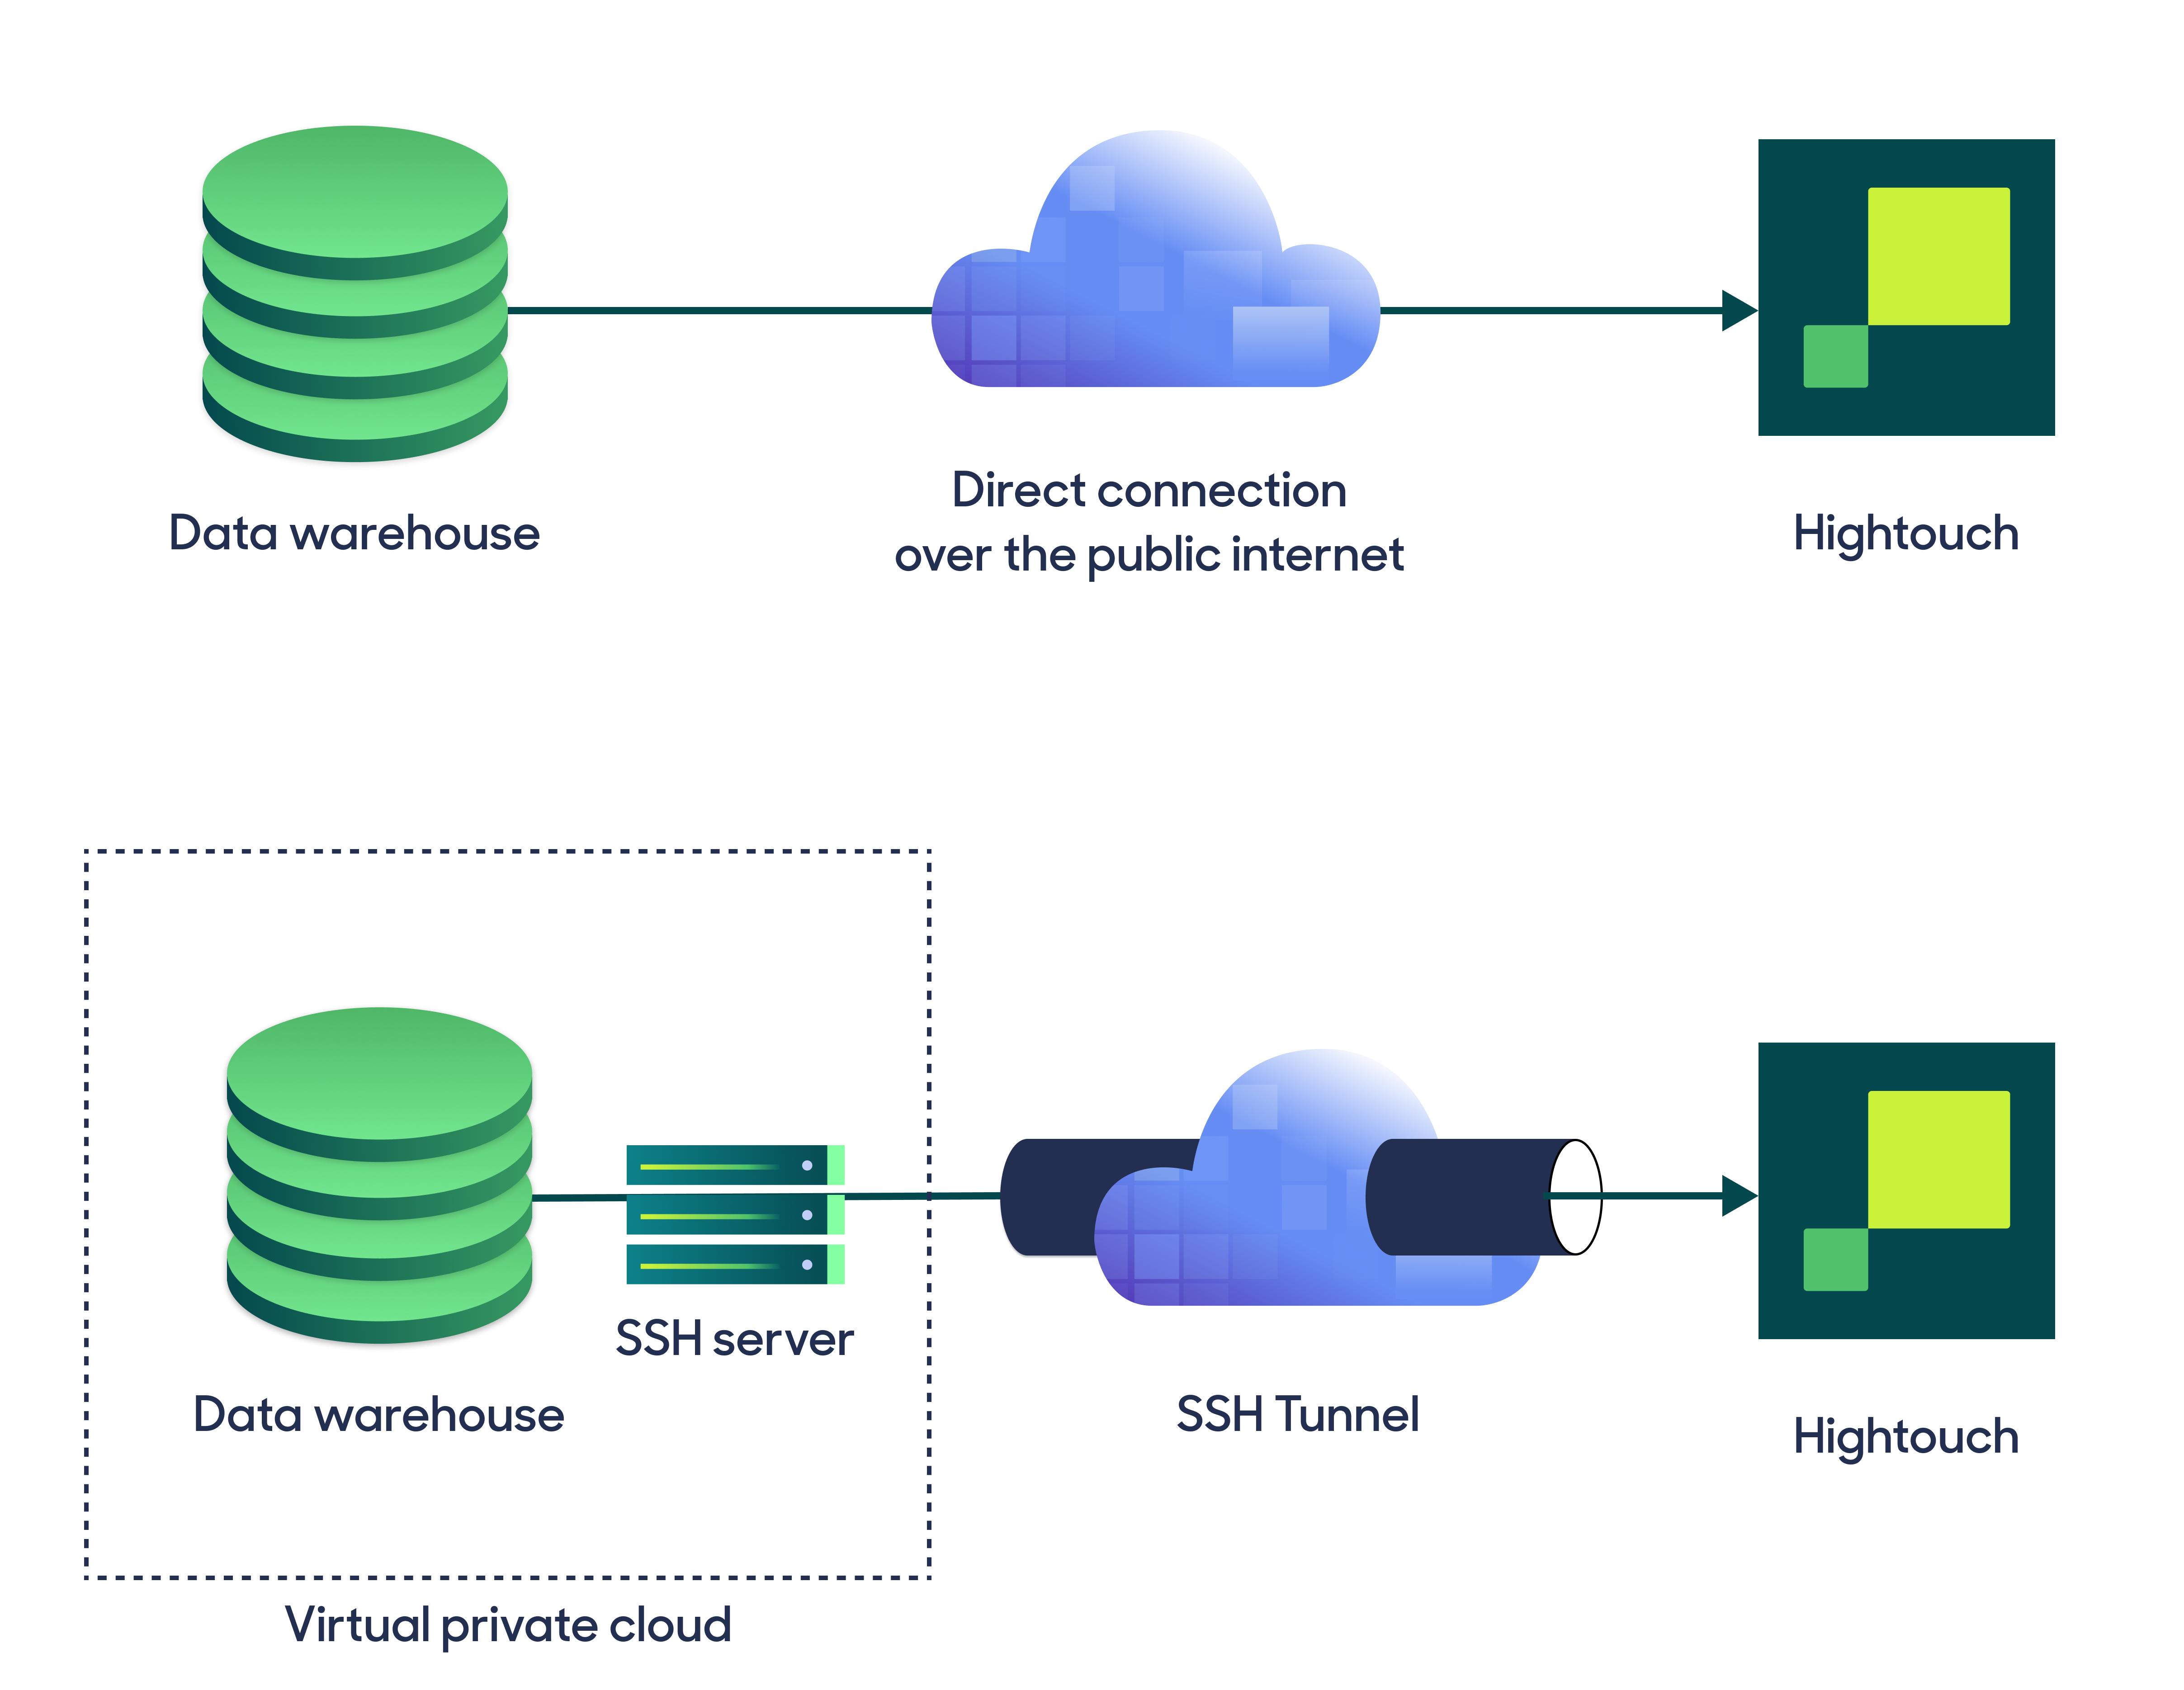
Hightouch can connect directly to Redshift over the public internet or via an SSH tunnel. Since data is encrypted in transit via TLS, a direct connection is suitable for most use cases. You may need to set up a tunnel if your Redshift instance is on a private network or virtual private cloud (VPC).

Hightouch supports both standard and reverse SSH tunnels. To learn more about SSH tunneling, refer to Hightouch's tunneling documentation.
Configure your source
Enter the following required fields into Hightouch:
- Host: The hostname or IP address of your Redshift cluster. The hostname can be found by visiting the Redshift web console, navigating to the Clusters panel, and clicking your cluster. Copy the Endpoint string, excluding the port and database name.
- Port: The port number of your Redshift cluster. The default is 5439, but yours may be different. To confirm, visit the Redshift web console, navigate to the Clusters panel, and click your cluster. The port number is shown in the Properties tab.
- Database: The name of the database in your Redshift cluster. Most clusters have only one database. Visit the Redshift web console, navigate to the Clusters panel, and click your cluster. The database name is shown in the Properties tab.
Choose your sync engine
For optimal performance, Hightouch tracks incremental changes in your data model—such as added, changed, or removed rows—and only syncs those records. You can choose between two different sync engines for this work.
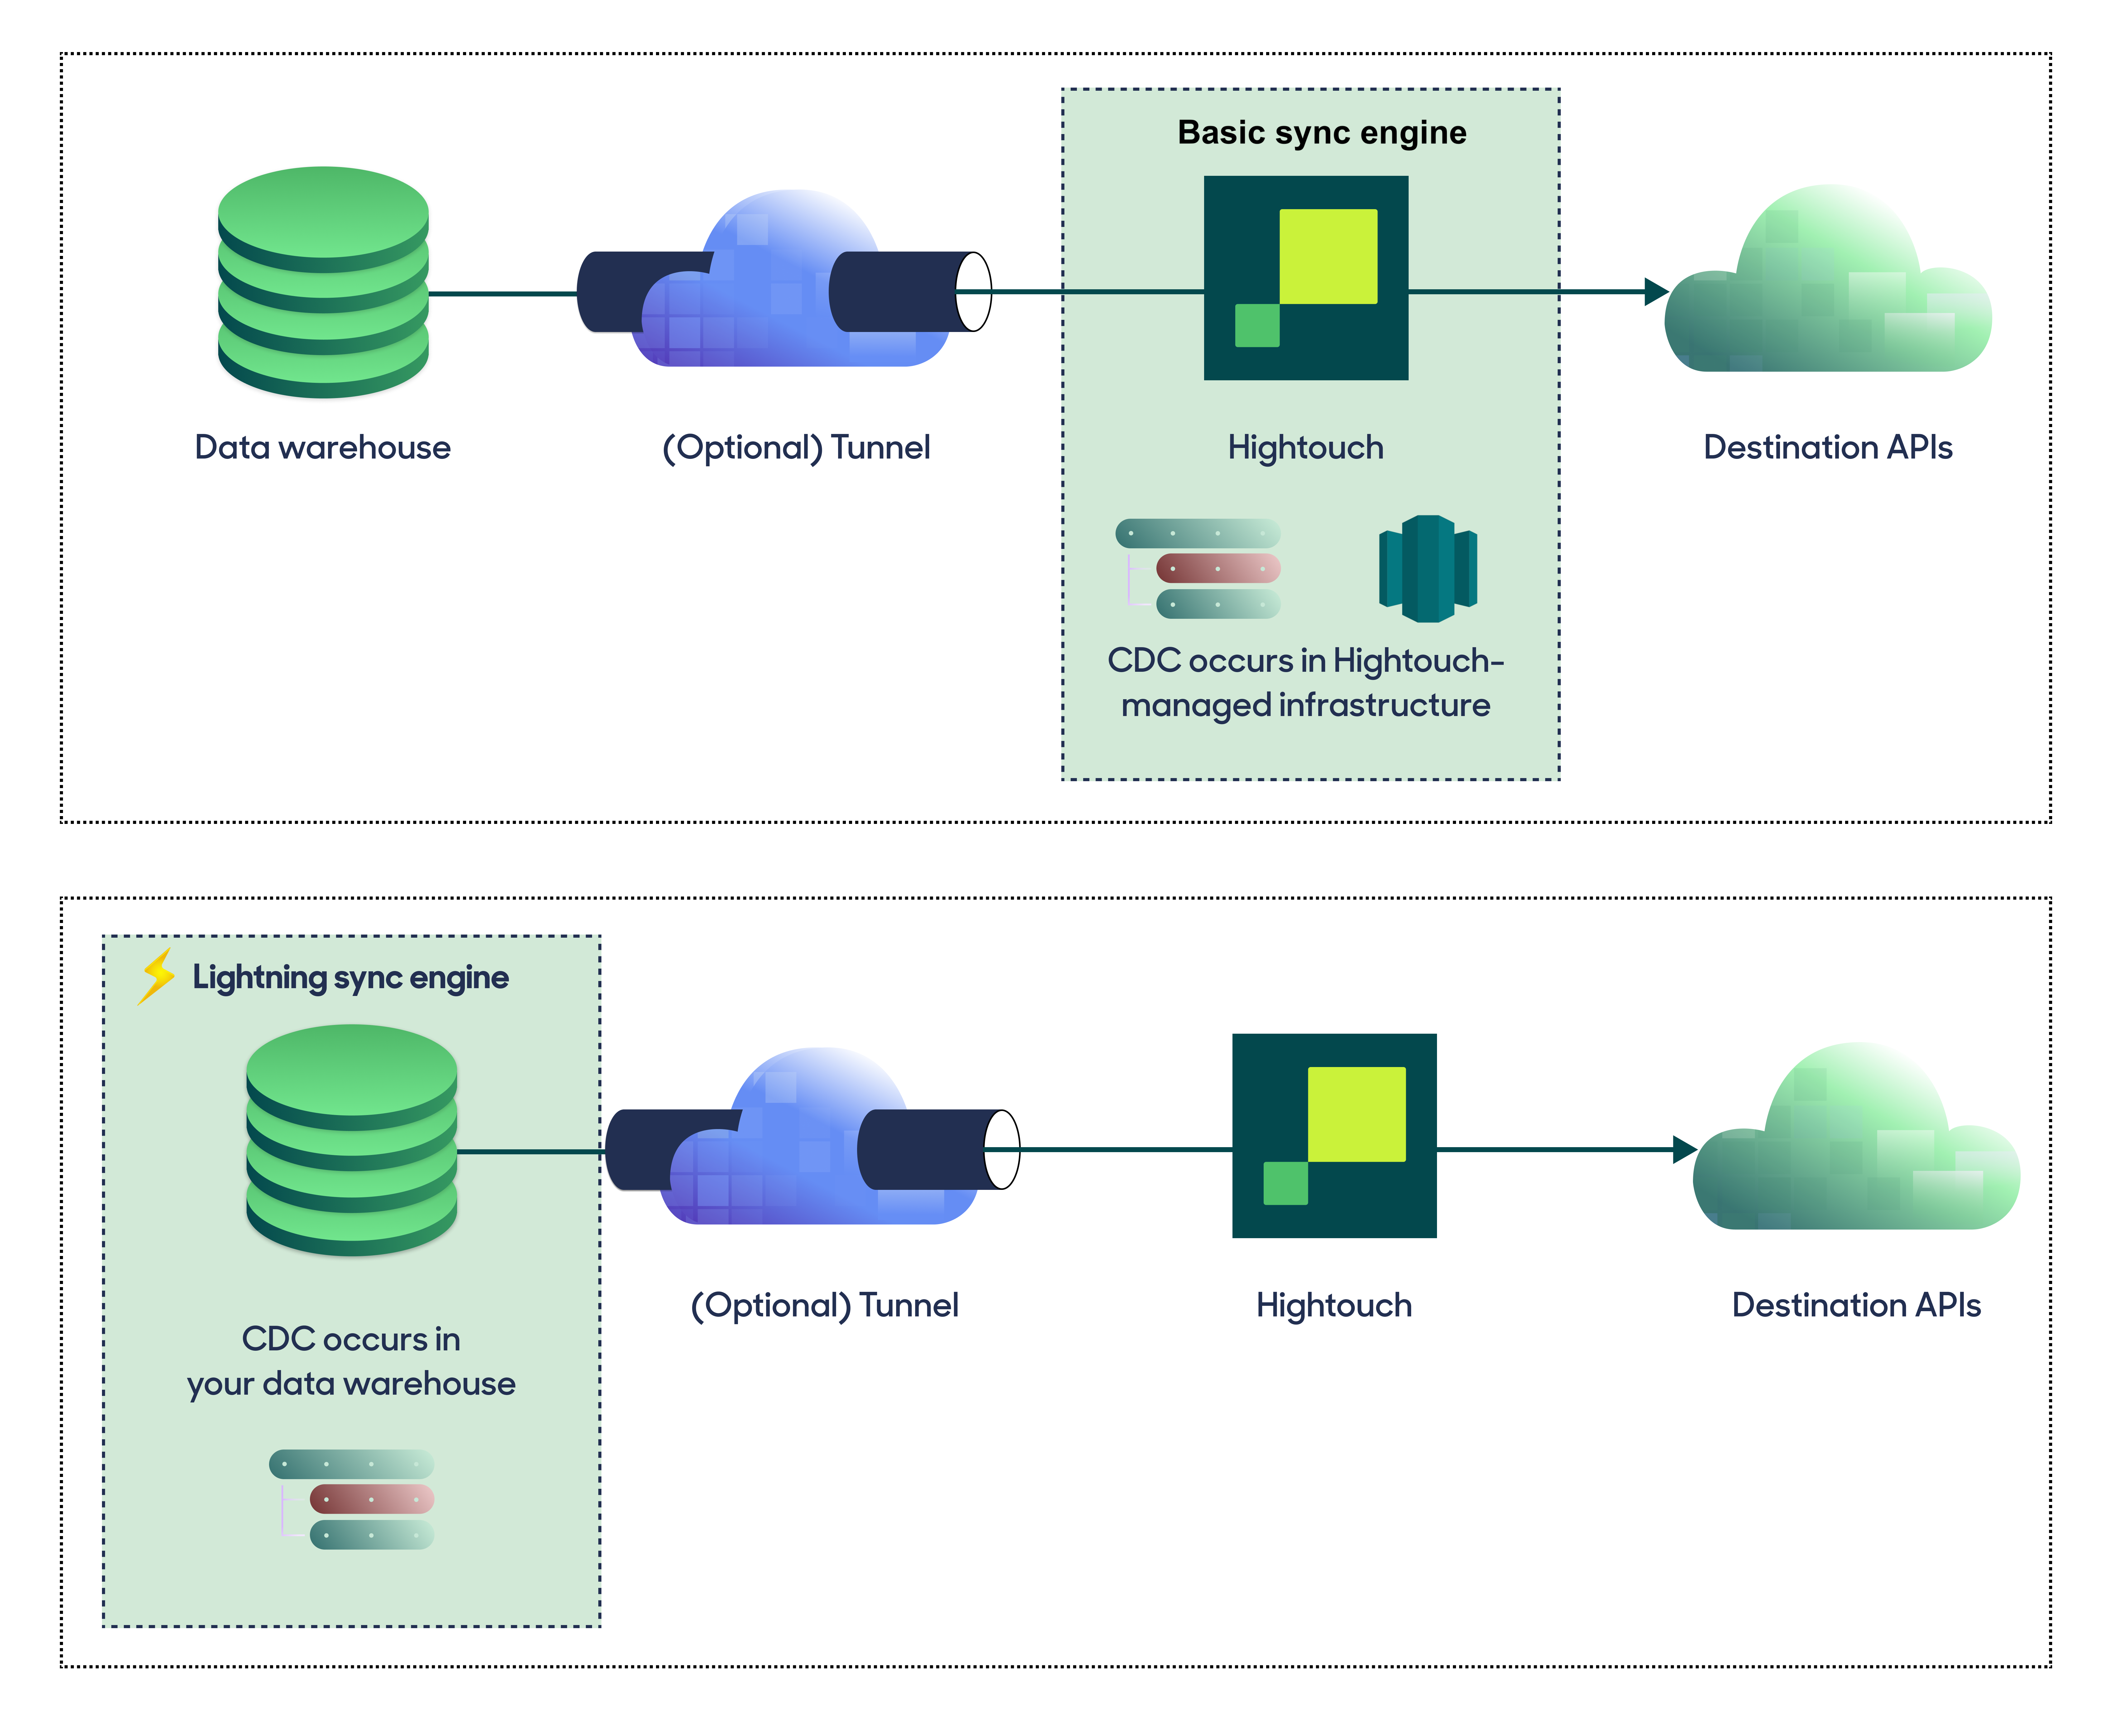
The Basic engine requires read-only access to Redshift. Hightouch executes a query in your database, reads all query results, and then determines incremental changes using Hightouch's infrastructure. This engine is easier to set up since it requires read—not write—access to Redshift.
The Lightning engine requires read and write access to Redshift. The engine stores previously synced data in a separate schema in Redshift managed by Hightouch. In other words, the engine uses Redshift to track incremental changes to your data rather than performing these calculations in Hightouch. Therefore, these computations are completed more quickly.

If you select the Basic engine, you can switch to the Lightning engine later. Once you've configured the Lightning engine, you can't move back to the Basic engine without recreating Redshift as a source.
To learn more, including migration steps and tips, check out the Lightning sync engine docs.
Basic versus Lightning engine comparison
The Lightning sync engine requires granting write access to your data warehouse, which makes its setup more involved than the Basic sync engine. However, it is more performant and reliable than the Basic engine. This makes it the ideal choice to guarantee faster syncs, especially with large data models. It also supports more features, such as Warehouse Sync Logs, Match Booster, and Identity Resolution.
| Criteria | Basic sync engine | Lightning sync engine |
|---|---|---|
| Performance | Slower | Quicker |
| Ideal for large data models (over 100 thousand rows) | No | Yes |
| Reliability | Normal | High |
| Resilience to sync interruptions | Normal | High |
| Extra features | None | Warehouse Sync Logs, Match Booster, Identity Resolution |
| Ease of setup | Simpler | More involved |
| Location of change data capture | Hightouch infrastructure | Redshift schemas managed by Hightouch |
| Required permissions in Redshift | Read-only | Read and write |
| Ability to switch | You can move to the Lightning engine at any time | You can't move to the Basic engine once Lightning is configured |
Lightning engine setup
To set up the Lightning engine, you need to grant Hightouch write access to Redshift. You can do so by running the following SQL snippet.
CREATE USER hightouch_user WITH PASSWORD '********';
CREATE SCHEMA IF NOT EXISTS hightouch_audit;
CREATE SCHEMA IF NOT EXISTS hightouch_planner;
GRANT CREATE, USAGE ON SCHEMA hightouch_audit TO hightouch_user;
GRANT CREATE, USAGE ON SCHEMA hightouch_planner TO hightouch_user;
The snippet creates a dedicated Amazon Redshift user for Hightouch. It also provisions two schemas, hightouch_planner and hightouch_audit, for storing logs of previously synced data.
Provide credentials
Enter the following fields into Hightouch:
- User: This can be your personal Redshift login or a dedicated user for Hightouch. At minimum, this user must have read access to the data you wish to sync. If using the Lightning sync engine, you must also grant this user additional permissions as described above.
- (Optional) Password: The password for the user specified above.
Test your connection
When setting up a source for the first time, Hightouch validates the following:
- Network connectivity
- Redshift credentials
- Permission to list schemas and tables
- Permission to write to
hightouch_plannerschema - Permission to write to
hightouch_auditschema
All configurations must pass the first three, while those with the Lightning engine must pass all of them.
Some sources may initially fail connection tests due to timeouts. Once a connection is established, subsequent API requests should happen more quickly, so it's best to retry tests if they first fail. You can do this by clicking Test again.
If you've retried the tests and verified your credentials are correct but the tests are still failing, don't hesitate to .
Next steps
Once your source configuration has passed the necessary validation, your source setup is complete. Next, you can set up models to define which data you want to pull from Amazon Redshift.
The Amazon Redshift source supports these modeling methods:
- writing a query in the SQL editor
- using the visual table selector
- leveraging existing dbt models
- leveraging existing Looker Looks
- leveraging existing Sigma workbooks
You may also want to consider storing sync logs in Redshift. Like using the Lightning sync engine versus the standard one, this feature lets you use Redshift instead of Hightouch infrastructure. Rather than performance gains, it makes your sync log data available for more complex analysis. Refer to the warehouse sync logs docs to learn more.
You must enable the Lightning sync engine to store sync logs in your warehouse.
Tips and troubleshooting
If you encounter an error or question not listed below and need assistance, don't hesitate to . We're here to help.
Spectrum nested query error
You may receive a Spectrum nested query error if you are using Amazon Redshift Spectrum as your data source.
Hightouch uses a wrapper query around your model query for obtaining the COUNT of query results. Spectrum has limitations around nested data that this can causes issues with.
To resolve the error, you can try the following:
- Create a materialized view of the results set you want Hightouch to query.
- Add a commented out
-- ORDER BYstatement to your model definition. Hightouch's Redshift source disables the row counter wrapper query if there's anORDER BYin the query. However, Redshift Spectrum doesn't allowORDER BYstatements, hence the need to comment it out. Even commented out, Hightouch disables the wrapper query.
Error: could not identify an ordering operator for type "unknown"
You may receive a this error if you are using many UNION set operators within your SQL query.
To resolve the error, you can try replacing UNION with UNION ALL. To learn more about UNION and UNION ALL, check out the article by The Data School.
Error: permission denied for relation 'objectname'
You may receive this error when trying to access newly created objects in the schema and you lack permissions to do so. This error happens when access is granted for only the objects present in a schema when the access was first granted. By default, access isn't automatically granted for objects that are created under the current schema.
To learn about how to grant permissions you can check the AWS documentation here.
